Wondering how to optimize your Amazon PPC Campaigns? I’ve been doing this full-time since 2015. Read below and do these 5 things to make sure your Sponsored Ads campaigns are performing to the best of their ability, and to DOMINATE your competition!
For this strategy at Amazon Marketing Company, we are going to find the keywords that you are spending money on that are not giving you a good return on investment. This strategy is specifically for Automatic and Manual Broad Match Campaigns.
Select one Campaign to start with, and click on it.
In the campaign, change the dates for the last 60 days.
Click on an Ad Group. For this campaign, it’s titled “All Products”. Click the corresponding one for your campaign.
On the left-hand side, click on “search terms.” You will find a list here of the EXACT terms that someone searched in order to find and click on your product.
Click on the column named “Clicks” twice so the term with the most clicks is at the top.
At this point, you need to decide how conservative or aggressive you want to be. The more aggressive you are, the faster you will grow/scale your business. BUT, you will also invest more money now, and some of the money will be lost. Depending on your level of investment, find the reference below.
Number of Clicks: Average: 5, Conservative: 10, Aggressive: 20
Once you’ve picked your number, look back at the list of Search Terms. Copy the ASIN’s and keywords that have had AT LEAST the number of clicks from the table with 0 sales.
These are deemed as keywords/items that you are not going to get a positive return on investment from.
Now that you have your list, click on the Negative Keywords tab on the right. In the negative keywords section, click “add negative keywords” and paste the list in. Click Save.
Click over to Negative Products, then take the list of ASIN’s that you’ve created and paste it in. Click Save.
That’s it! If you want to have a lean, profitable PPC system, you should repeat this process ONCE PER WEEK.
Did you know that you can control the budget for different places you show up on Amazon? We’re constantly shocked at how often other agencies don’t even make adjustments here.
I’ve spoken with Ad “Experts” who didn’t even know what this is. But this can be something that makes a huge difference in your ad performance.
To view your placements, open up a campaign in the Amazon Console. Click on “Placements" on the left side
(Placements Selection. Add a red box around “placements”)
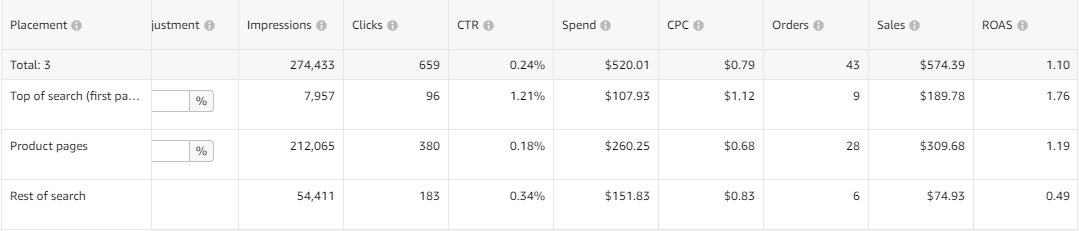
When you get here, you’ll see the different placements that you show up. It will look like this:
(Placements 1 & Placements 2)
Let’s analyze what we see here. We have 3 potential placements: Top of Search, Product Pages, and Rest of Search.
One thing that we see consistently is that the top of search has a higher CTR and a higher CVR than other placements. Let’s check if this is true here:
So, where is it best to show up? Almost always, it’s best to show up at the top of search.
It’s interesting to note here that the CPC of the Top of Search is always higher than the other placements. This is because your competitors know that the CTR and CVR rate are better at the top, so they are willing to spend more money to get a click there.
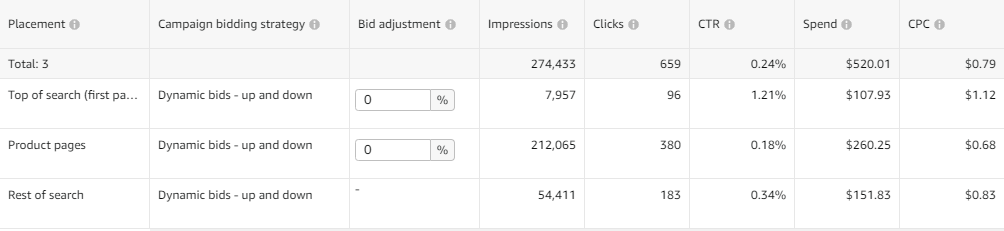
To increase the impressions on the top of search, you’ll want to be more aggressive with your bid.
Here is where you bid extra to show up at the top:
(Placements 1, box around top box)
The bid adjustment increases your bid to show up in the area. This takes your standard bid and increases it by the percentage added.
If your bid is $1.00, and you put a bid adjustment of 100%, then you will increase your bid from $1.00 to $2.00.
I usually start with a top of search adjustment at 100%. Every week, you come in and see what your ROAS is. If the ROAS is acceptable, then leave it where it is. If the ROAS is too low, then you might want to lower your bid adjustment.
Repeat this process for product page adjustments as well.
Search Term Isolation is the process of creating new campaigns that have ONE KEYWORD/ASIN and ONE TARGET PRODUCT.
When you setup an automatic campaign for a product, there are thousands of potential keywords and products that can be targeted by that campaign.
(Automatic Clicks+Targets)
Here is a standard automatic campaign. There are 232 clicks, and 88 targets. Out of the thousands of targets that your product COULD be applicable for, you only hit 88 of them in this campaign over a 60 day period.
It’s common that we see the budget go towards only 5 or so keywords in a broad or automatic campaign. This causes 2 problems:
This is easiest to do while doing the Negative Keywords above.
Wonder what your competitors are targeting to be successful? While we can’t know exactly what they are doing, you can at least have a good idea by running a competitor look-up on Jungle Scout using Keyword Scout (if you don’t have it yet, you can get a discount here).
How to: Install the JS Chrome extension > while on a competitor’s listing, click the keywords icon > it will take you to Keyword Scout.
The Keyword Scout page shows lots of data for a product. Such as Organic Rank, Sponsored Rank, search volume, PPC bid, and more. If a product has a Sponsored Rank for a keyword, this indicates that they are bidding on this keyword!
The goal is to find out what your competitors are ranking in. Anything that your competitors are ranked in the top 10 of, you need to ask a few questions:
By now, most of your ads are on the offense; they are looking to go get new customers who don’t know who you are. This one is the only defensive ad we recommend.
Target your own brand. Do this in a manual campaign, targeting your brand as a broad keyword. Then add exact keywords that have your brand name, plus the most relevant keywords.
Example: Your brand is “my store” and you sell a toilet paper holder. You would want to broad match “my store” then exact target keywords like “my store toilet paper holder” and “my store tp holder”.
Be sure to keep these in separate campaigns so the ACOS data will be separate. It’s normal for the ACOS on brand campaigns to be really good.^
OK, these were 5 steps to optimize your PPC campaigns! Of course, there’s lots more to optimizing, but this is a great start! Many of your competitors may not be doing these things, so you’re already at an advantage!
Wondering how to set up PPC campaigns the correct way? Watch Ryan’s tutorial and read this blog.
About the Author:
Riley Bennett is the Co-Founder and CEO of www.amazingmarketingco.com, an Amazon Marketing Company, and he has over 6+ years of Amazon Sales experience.